Graco Benton 5-in-1 Convertible Crib Assembly Instructions: A Comprehensive Guide
Navigating the assembly of your Graco Benton crib is simplified with readily available resources, including official videos and downloadable manuals for a smooth process.
Black Friday deals and reviews highlight the crib’s ease of assembly, focusing on instruction clarity and hardware completeness for a positive building experience.
Safety recalls emphasize the importance of proper assembly to prevent entrapment hazards, ensuring a secure sleep environment for your little one, as per CPSC guidelines.
The Graco Benton 5-in-1 Convertible Crib stands as a popular choice for modern families, celebrated for its versatility and enduring style. This crib seamlessly adapts to your child’s evolving needs, transitioning from a safe infant haven to a cozy toddler bed, convenient daybed, and ultimately, a full-size bed.
Millions of North American families have placed their trust in this iconic design, appreciating its blend of functionality and aesthetic appeal. Understanding the assembly process is key to unlocking the crib’s full potential. Resources like official assembly videos and readily available instruction manuals are designed to guide you through each step, ensuring a secure and stable foundation for your child’s sleep.
Ease of assembly is a frequently praised feature, though careful attention to detail and adherence to the provided instructions are paramount for a successful build.
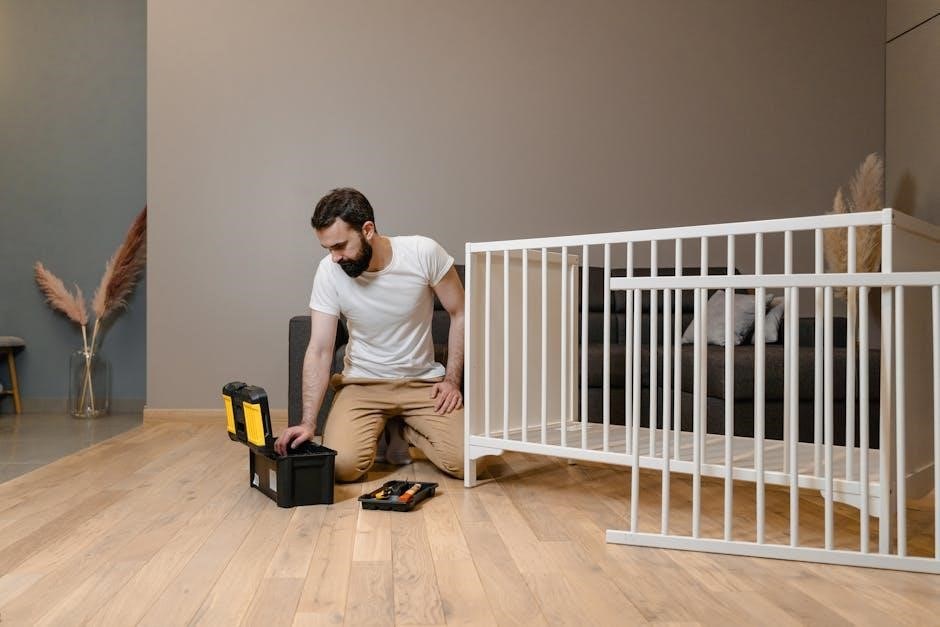
Unboxing and Parts Inventory
Begin the assembly process by carefully unboxing all components of your Graco Benton crib. A systematic approach is crucial to ensure no parts are overlooked. Lay out all pieces on a protected surface to prevent scratches or damage during inventory.
Cross-reference the included parts list with the physical components. This list, found within your instruction manual, details every screw, bolt, rail, and panel required for assembly. Pay close attention to hardware quantities; missing parts can halt progress.
Confirm all necessary items are present before proceeding. If discrepancies arise, immediately consult the customer support contact information provided with your crib to request replacements.
Tools Required for Assembly
Successful Graco Benton crib assembly relies on having the correct tools readily available. While some basic tools may be included, several others are highly recommended for efficiency and ease of construction.
A Phillips head screwdriver is essential, both manual and powered options are suitable, but be cautious with power tools to avoid over-tightening. A rubber mallet can assist with gently securing joints without causing damage.
Consider a level to ensure the crib is perfectly balanced and stable, preventing wobbling; Finally, having a soft cloth on hand is useful for protecting the crib’s finish during assembly.
Step-by-Step Assembly Process
Follow the official Graco assembly video and included manual closely, ensuring each step is completed accurately for a safe and sturdy crib build.
Assembling the Crib Frame

Begin by carefully laying out all frame pieces, referencing the parts list in your instruction manual to confirm everything is present. Connect the headboard and footboard to the side rails using the provided bolts and Allen wrench.
Ensure a snug fit, but avoid over-tightening initially, allowing for adjustments as you progress. Double-check alignment to create a rectangular frame, which forms the foundation of the crib’s stability.
Pay close attention to the orientation of each piece, as incorrect placement can hinder later steps. A properly assembled frame is crucial for the overall structural integrity and safety of the Graco Benton crib.
Attaching the Crib Legs
With the crib frame assembled, carefully attach the legs to each corner, utilizing the designated bolt holes and included hardware. Ensure each leg is securely fastened, providing a stable base for the crib.
Tighten the bolts firmly, but avoid excessive force that could damage the wood. Verify that all legs are level to prevent wobbling and ensure the crib sits evenly on the floor.
Proper leg attachment is vital for the crib’s stability and safety, preventing tipping or shifting. Refer to the assembly video for visual guidance on correct leg placement and tightening procedures.
Installing the Mattress Support
Once the crib frame and legs are secure, install the mattress support system, typically consisting of a metal frame or wooden slats. Position the support at the desired height level, utilizing the pre-drilled holes within the crib frame.
Ensure the support is firmly locked into place, using the provided screws or locking pins. Double-check that the support is level and evenly distributed across the crib’s interior.
Proper mattress support installation is crucial for safe sleep, preventing accidental falls or entrapment. Refer to the manual for specific height adjustment options and safety guidelines.
Securing the Side Rails
With the frame, legs, and mattress support in place, carefully attach the side rails to the crib structure. Align the rails with the designated slots or mounting points on the frame, ensuring a flush and secure fit.
Utilize the provided hardware – screws, bolts, or locking mechanisms – to firmly fasten the side rails. Tighten all fasteners evenly, avoiding over-tightening which could damage the wood.
Confirm the side rails are stable and cannot be easily dislodged, as this is vital for preventing accidental falls and ensuring a safe sleep environment for your baby.

Convertible Features and Adjustments
The Graco Benton’s versatility allows transitions from crib to toddler bed, daybed, and full-size bed, adapting to your child’s growth stages with ease.
Adjusting Mattress Height
The Graco Benton crib offers multiple mattress height positions, crucial for adapting to your baby’s developmental stages and ensuring safety. Initially, set the mattress at the highest level to ease access and reduce back strain during frequent lifting.
As your baby begins to sit or stand, lower the mattress to the middle setting to prevent accidental climbing and potential falls. Finally, when your child is consistently standing, the lowest position provides maximum security.
Always ensure the mattress is securely locked into the chosen position and that there are no gaps between the mattress and the crib sides. Regularly check the locking mechanisms to maintain a safe sleep environment.
Transitioning to Toddler Bed Configuration
Converting the Graco Benton to a toddler bed involves removing one of the crib side rails, creating a low-to-the-ground sleeping space suitable for growing toddlers. This transition typically requires a separate toddler bed rail kit, sold independently, for added safety.
Carefully follow the assembly manual’s instructions for side rail removal, ensuring all hardware is properly secured. The remaining side rail provides a barrier, while the open side allows for easier independent access.
Always supervise your toddler during the initial adjustment period and ensure the room is appropriately childproofed to prevent falls or injuries.
Converting to Daybed Mode
Transforming the Graco Benton into a daybed requires removing both side rails, effectively lowering the sleep surface to floor level. This configuration offers a versatile space for rest, reading, or playtime during waking hours.

Refer to the assembly manual for detailed instructions on side rail detachment, ensuring all components are safely stored away. A daybed provides a comfortable and accessible sleeping option as your child grows.
Prioritize safety by placing the daybed against a wall or utilizing a soft rug to cushion potential falls. Supervise your child during initial use to ensure they adjust comfortably to the new setup.
Full-Size Bed Conversion Details
Converting the Graco Benton to a full-size bed necessitates purchasing a separate full-size bed frame and mattress, as these are not included with the crib. The existing crib headboard and footboard are designed to attach to the purchased frame.
Carefully follow the instructions in the assembly manual for attaching the crib components to the bed frame, ensuring secure and stable connections. This conversion extends the crib’s usability for years to come.
Double-check all hardware and connections before use, prioritizing safety and stability. A full-size bed offers a long-term sleep solution as your child continues to grow.
Safety Considerations and Warnings
Prioritize safety during assembly and use, addressing potential entrapment and choking hazards with small parts. Ensure a proper mattress fit for a secure sleep environment.
Crib Entrapment Hazards
Entrapment within the crib poses a serious risk, as highlighted by recalls involving Graco and Simplicity cribs. Carefully follow assembly instructions to ensure all components are securely fastened, eliminating gaps or openings where a child could become trapped.
Regularly inspect the crib for loose hardware or structural weaknesses that could create entrapment points. Avoid using aftermarket parts not specifically designed for the Graco Benton, as these may compromise safety standards.
Maintain awareness of the mattress height and adjust it appropriately as your child grows to prevent climbing and potential falls. Never place soft bedding, pillows, or toys in the crib that could obstruct breathing or create a suffocation hazard.
Small Parts and Choking Hazards
During Graco Benton assembly, be mindful of small parts like screws, bolts, and dowels. Keep these components out of reach of children to prevent accidental ingestion, which presents a significant choking hazard.
Thoroughly check the assembly area after each step to ensure no small parts remain. Inspect the crib regularly for any loose or missing hardware that could detach and become a choking risk.
The instruction manual emphasizes the potential for small parts to pose a danger. Prioritize a safe assembly environment and diligent inspection to safeguard your child from choking hazards associated with the crib’s construction.
Proper Mattress Fit
Ensuring a proper mattress fit is crucial for safety when assembling your Graco Benton crib. A snug fit prevents gaps where a baby could become entrapped, posing a suffocation risk. Always use a mattress designed specifically for this crib model, adhering to the manufacturer’s dimensions.

Verify that the mattress fills the entire crib frame without any spaces exceeding the allowable gap specified in the instruction manual. Regularly check the mattress fit as the crib is adjusted to different height settings.
A correctly fitted mattress is a fundamental safety requirement, contributing to a secure sleep environment for your infant.
Troubleshooting Common Assembly Issues
Common issues include missing hardware or difficulty aligning parts; carefully review the instruction manual and assembly videos for clarification and solutions.
Ensure all components are correctly oriented and that you haven’t skipped any steps during the building process for a seamless setup.
Missing Hardware
Discovering missing hardware during Graco Benton crib assembly is a surprisingly common frustration. First, meticulously re-check all packaging materials – sometimes smaller pieces are tucked away or hidden within protective layers.
If a part is genuinely absent, don’t attempt to substitute with non-Graco components, as this could compromise the crib’s structural integrity and safety.
Fortunately, Graco offers dedicated customer support and replacement part services. Locate your crib’s model number and purchase date, then contact Graco directly through their official website or customer service line.
Be prepared to provide details about the missing part, and they will typically ship a replacement free of charge, ensuring a complete and safe assembly.
Difficulty Aligning Parts
Encountering alignment issues during Graco Benton crib assembly is often due to subtle variations in manufacturing or shipping. Avoid forcing components together, as this can damage the wood or strip screw holes.
Loosen previously tightened screws slightly to allow for greater flexibility and adjustment. Double-check that you’re using the correct hardware for each connection, referencing the instruction manual carefully.
Sometimes, simply reversing the order of assembly for a specific section can resolve alignment problems. If issues persist, review the official Graco assembly video for visual guidance and troubleshooting tips.
A second pair of hands can also be incredibly helpful in holding parts steady and ensuring proper alignment.
Understanding the Instruction Manual
The Graco Benton crib’s instruction manual is your primary guide, detailing each assembly step with diagrams and parts lists. Before beginning, familiarize yourself with all components and hardware, verifying everything is present.
Pay close attention to the orientation of parts in the illustrations; subtle differences can impact assembly. The manual specifies the correct screw types for each connection – using the wrong ones can cause damage.
Online resources, including downloadable manuals, are available if your physical copy is lost or damaged. Refer to the manual frequently throughout the process, and don’t hesitate to re-read sections if unsure.
The manual also outlines safety warnings and maintenance guidelines.

Resources and Support
Graco provides comprehensive support, including official assembly videos and readily accessible customer service contact information for assistance with your Benton crib.
Replacement parts are available to ensure the longevity of your crib, and online communities offer shared experiences and troubleshooting tips.
Official Graco Assembly Video
Graco offers a dedicated, step-by-step assembly video specifically for the Benton 5-in-1 Convertible Crib. This visual guide, featuring Caesar, demonstrates the entire process from unboxing to a baby-ready finished product.
The video highlights key features and simplifies complex steps, making it an invaluable resource for first-time parents or those preferring a visual learning experience.
It’s strongly recommended to reference your crib’s physical instruction manual alongside the video to ensure all parts are correctly identified and securely fastened.
This combined approach guarantees a safe and accurate assembly, maximizing the crib’s functionality and providing peace of mind for parents.
Find the official video online to streamline your assembly process!
Customer Support Contact Information

If you encounter any issues during the Graco Benton crib assembly, Graco’s customer support team is available to assist. While specific contact details aren’t explicitly provided in the readily available snippets, accessing their official website is the best starting point.
Look for a “Contact Us” or “Customer Service” section on Graco’s website to find phone numbers, email addresses, or live chat options.
Having your crib’s model number and purchase date readily available will expedite the support process.
Don’t hesitate to reach out if you’re missing hardware, experiencing difficulty aligning parts, or need clarification on the instruction manual.
Graco aims to provide helpful assistance to ensure a safe and successful assembly!
Where to Find Replacement Parts
Locating replacement parts for your Graco Benton 5-in-1 Convertible Crib is crucial if any components are missing or damaged during assembly. The primary source for genuine Graco replacement parts is through their official website.
Navigate to the “Parts” or “Customer Service” section of the Graco site and search using your crib’s model number.
Alternatively, authorized Graco retailers may also carry replacement parts.
Online marketplaces like Amazon sometimes offer Graco parts, but ensure the seller is reputable to guarantee authenticity.
Keep your purchase information handy when ordering to verify compatibility!
Maintenance and Care
Regularly inspect the Graco Benton crib for loose hardware, ensuring continued stability and safety.
Clean the crib with a mild soap and water solution, avoiding harsh chemicals to preserve the finish and materials.
Cleaning the Crib

Maintaining a clean Graco Benton crib is crucial for your baby’s health and hygiene. Regular cleaning prevents the buildup of dust, allergens, and potential bacteria.
For routine cleaning, use a soft, damp cloth with mild soap and water. Avoid abrasive cleaners, solvents, or harsh chemicals, as these can damage the crib’s finish and potentially harm your child.
Wipe down all surfaces, including the rails, headboard, footboard, and mattress support frame. Pay close attention to areas where drool or spills may occur.
Ensure the crib is completely dry before placing the mattress and bedding back inside. This prevents mold and mildew growth. Periodic checks for sticky residue or stubborn stains are recommended.
Regular Inspection for Loose Hardware
Consistent inspection of the Graco Benton crib’s hardware is paramount for continued safety and stability. Over time, with normal use and the crib’s convertible features, components can loosen.
At least monthly, meticulously check all screws, bolts, and connecting points. Gently attempt to wiggle each piece to identify any movement or play.
Tighten any loose hardware immediately using the appropriate tools. Do not overtighten, as this could strip the screws or damage the wood.
Pay particular attention to the legs, side rails, and mattress support system. A secure structure is vital as the crib transitions through its various configurations.