Brio Water Dispenser Manual: A Comprehensive Guide
Are you the proud owner of a Brio water dispenser and eager to ensure it operates smoothly for years to come? Whether you’re a first-time user or need a refresher on best practices, this comprehensive Brio Water Dispenser Manual will guide you through everything from setup to regular maintenance.
Recent gatherings of Brio enthusiasts demonstrate a strong community focused on sharing experiences and modifications. Proper cleaning, including the bottle adapter tube and taps, is crucial each time you change or refill your water bottle.
Addressing issues like flashing lights and constant beeping, as reported by some users, is a key focus of this manual, alongside guidance for long-term storage and reactivation.

Brio water dispensers represent a commitment to providing convenient, high-quality hydration solutions for homes and offices. These dispensers are designed with user-friendliness and reliability in mind, offering both hot and cold water options to suit diverse preferences. The growing community surrounding Brio, evidenced by recent enthusiast gatherings, highlights the brand’s popularity and the shared passion for optimizing the user experience.
From sleek countertop models to larger, floor-standing units, Brio caters to a variety of needs and spaces. Understanding the core functionality and maintenance requirements is essential for maximizing the lifespan and performance of your dispenser. This manual serves as a comprehensive resource, guiding you through every step – from initial setup and water line connections to regular cleaning and troubleshooting common issues like flashing lights and persistent beeping.
Brio’s design philosophy emphasizes both practicality and aesthetic appeal. The initial spark for many owners, as one enthusiast described, came from the futuristic design and the promise of a spirited hydration experience. Whether you’ve recently acquired a Brio dispenser or are considering one, this introduction sets the stage for a rewarding and hassle-free ownership journey. Proper care, including consistent cleaning of components like the bottle adapter tube, ensures continued optimal performance.
Understanding Your Brio Model
Brio water dispensers come in various configurations, each designed to meet specific hydration needs. Identifying your exact model is the first step towards effective operation and maintenance. Key distinctions lie in the water source – bottle-fed, direct water line connection, or both – and the features offered, such as self-cleaning functions or digital temperature controls.
Models connecting to a water line, often situated near the refrigerator, require careful attention to connection integrity to prevent leaks. Bottle-fed models necessitate regular bottle changes and thorough cleaning of the bottle adapter tube. Familiarize yourself with the location of key components, including the hot and cold water taps, the drip tray, and any indicator lights.
Understanding the function of these lights is crucial; a flashing hot water light accompanied by beeping, as reported by some users, often signals a specific issue requiring attention. Refer to the troubleshooting section of this manual for guidance. The recent enthusiasm within the Brio community underscores the importance of shared knowledge and model-specific insights. Knowing your model empowers you to optimize its performance and address any challenges effectively.
Initial Setup and Installation
Before powering on your Brio water dispenser, careful setup and installation are paramount. Begin by selecting a stable, level surface capable of supporting the dispenser’s weight, especially when a full water bottle is in place. Ensure adequate ventilation around the unit to prevent overheating. If connecting to a water line, verify the compatibility of your plumbing and have the necessary adapters readily available.
For bottle-fed models, inspect the bottle adapter tube for any damage or obstructions before installation. A clean adapter tube is vital for hygienic water delivery. If utilizing a direct water line connection, follow the instructions in the dedicated ‘Connecting to a Water Line’ section. Prior to the initial power-up, thoroughly clean the cabinet, controls, and water taps with a food-grade sanitizer or mild bleach solution.
Remember, as highlighted by Brio enthusiasts, proper preparation extends the lifespan of your dispenser. After installation, proceed to the ‘Powering On and Initial Flushing’ stage to ensure optimal performance and remove any residual manufacturing debris. A well-executed initial setup lays the foundation for years of reliable hydration.
Connecting to a Water Line
Connecting your Brio dispenser to a dedicated water line requires careful attention to detail for a secure and sanitary connection. First, locate a cold water supply line near the desired installation point. Ensure the water pressure is within the manufacturer’s specified range – excessive pressure can damage the unit. You’ll need appropriate fittings, typically a compression adapter, to connect the dispenser’s water inlet to your plumbing.
Before starting, shut off the water supply to the line you’ll be tapping into. Carefully drill a hole in the cold water line, sized to accommodate the adapter. Install the adapter, ensuring a watertight seal using Teflon tape on the threads. Connect the dispenser’s water inlet tubing to the adapter, again verifying a secure connection.
Slowly turn the water supply back on, checking for any leaks at the connection points. If leaks are present, tighten the fittings or reapply Teflon tape. Remember, a properly connected water line provides a continuous supply of fresh, filtered water, eliminating the need for manual bottle changes. Regular inspection of the connection is recommended.
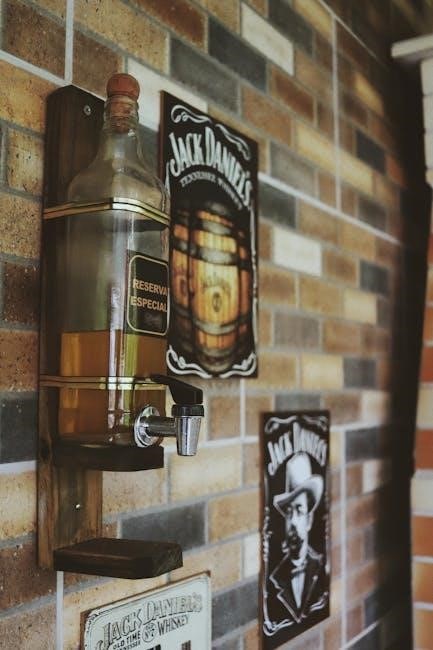
Bottle Adapter Tube Installation
Proper installation of the bottle adapter tube is crucial for hygienic water delivery when using bottled water with your Brio dispenser. Begin by ensuring the dispenser is powered off. Locate the bottle adapter opening on the top of the unit. Carefully insert the adapter tube into this opening, ensuring it’s firmly seated and aligned correctly.
Next, place the bottle securely onto the adapter. The probe within the adapter tube must fully penetrate the bottle’s cap to draw water effectively. Clean your cabinet, controls, bottle adapter tube, and water taps each time you change or refill your water bottle – this prevents bacterial growth and maintains water purity.
Inspect the connection between the bottle and adapter for any leaks. If leaks occur, ensure the bottle cap is properly pierced and the adapter is correctly positioned. Remember to use only appropriately sized bottles compatible with your Brio model. Regular cleaning of the adapter tube with a food-grade sanitizer is highly recommended to maintain optimal hygiene.
Powering On and Initial Flushing
After completing the water line connection or bottle adapter installation, it’s time to power on your Brio dispenser and initiate the crucial flushing process. Plug the dispenser into a grounded electrical outlet. You’ll likely notice the power indicator illuminate, signaling the unit is receiving power.
Initial flushing removes any residual air or manufacturing debris from the internal water lines, ensuring clean and fresh-tasting water. Dispense water from both the hot and cold taps for several minutes – approximately 5-10 minutes is recommended. You may observe some bubbling or discoloration during this initial flush; this is normal.
Continue flushing until the water runs clear and consistently. If the dispenser is not in use for longer than a 24-hour period, turn off the red hot-water and green cold-water switches to conserve energy. Repeat the flushing process if the dispenser has been idle for an extended period. This ensures optimal water quality and performance.
Operating the Dispenser: Hot & Cold Water
Your Brio water dispenser is designed for convenient access to both hot and cold water. Locate the designated taps for each temperature – typically color-coded with red for hot and blue or green for cold. Before dispensing, ensure a glass or container is properly positioned to prevent spills.
To dispense hot water, gently press the hot water tap. Exercise caution as the water will be at a high temperature. The dispenser features safety mechanisms, but responsible use is paramount. For cold water, press the corresponding cold water tap.
The hot water tap may have a safety lock to prevent accidental activation, especially important in households with children. Familiarize yourself with this feature. Remember, if the dispenser is not in use for an extended period, turning off the hot and cold switches can conserve energy. Enjoy the convenience of readily available, purified water at your desired temperature!
Troubleshooting: Flashing Lights & Beeping
Flashing lights and beeping sounds on your Brio dispenser indicate an issue requiring attention. A constantly flashing hot water light accompanied by beeping, as some users have reported, often signals a problem with the heating element or water flow. First, ensure the unit is properly connected to a power source and the water supply is turned on.
If the issue persists, check for any kinks or obstructions in the water line. Low water pressure can also trigger these alerts. A flashing cold water light may indicate a similar issue with the cooling system. Refer to the dispenser’s error code chart (if available in your model’s manual) for specific diagnoses.
If you’ve tried these basic steps and the problem continues, contact Brio customer support for assistance. Do not attempt to disassemble or repair the unit yourself, as this could void the warranty and pose a safety risk. Document the specific flashing pattern and beeping sequence to help the support team diagnose the problem efficiently.
Cleaning and Sanitization Procedures
Maintaining a clean Brio water dispenser is crucial for ensuring water purity and longevity of the unit. Regularly cleaning the cabinet, controls, bottle adapter tube, and water taps is essential, ideally each time you change or refill your water bottle. Use a soft, clean cloth and a food-grade sanitizer or a diluted bleach solution – always rinse thoroughly with potable water afterward to remove any residual cleaning agents.
The drip tray and grid should be emptied and cleaned as needed to prevent bacterial growth and maintain hygiene. For a more thorough sanitization, consider flushing the entire system with a food-grade sanitizer solution, following the manufacturer’s instructions carefully. This helps eliminate any buildup of biofilm or mineral deposits.
Avoid abrasive cleaners or scouring pads, as these can damage the dispenser’s surfaces. Always disconnect the power supply before commencing any cleaning procedures. Consistent cleaning not only improves water quality but also extends the lifespan of your Brio dispenser.
Regular Maintenance Schedule
To ensure optimal performance and longevity of your Brio water dispenser, a consistent maintenance schedule is vital. A basic weekly check should include emptying and cleaning the drip tray and grid, and wiping down the exterior surfaces with a soft, damp cloth. Monthly, inspect the bottle adapter tube for any signs of wear or damage, replacing it if necessary.
Every three months, a more thorough cleaning is recommended. This involves flushing the system with a food-grade sanitizer, as detailed in the ‘Cleaning and Sanitization Procedures’ section. Annually, consider a professional inspection to check for any internal issues or potential repairs. If the dispenser is left unused for over 24 hours, turning off the hot and cold water switches can conserve energy.
Remember to document all maintenance activities to track the dispenser’s service history. Following this schedule will help prevent issues and keep your Brio dispenser providing clean, refreshing water for years to come.

Drip Tray and Grid Cleaning
Maintaining a clean drip tray and grid is essential for hygiene and preventing potential water damage. Regularly emptying the drip tray – ideally daily or as needed – prevents overflow and bacterial growth. To clean, carefully remove the drip tray and grid from the dispenser. Wash both components with warm, soapy water, using a soft sponge or cloth to avoid scratching.
For stubborn stains or residue, a diluted solution of food-grade sanitizer or bleach can be used, ensuring thorough rinsing afterward to remove any chemical traces. Inspect the grid for any blockages that might impede drainage and clear them as necessary. Before reassembling, ensure both the tray and grid are completely dry to prevent mold or mildew.
Consistent cleaning of the drip tray and grid contributes to the overall cleanliness of your Brio water dispenser and ensures the water dispensed remains fresh and pure. This simple task significantly impacts the dispenser’s performance and longevity.
Water Bottle Changing & Refilling
Proper water bottle handling is crucial for maintaining the purity of your dispensed water. Before changing or refilling a bottle, always ensure the dispenser is powered off to prevent accidental activation. Carefully lift the existing bottle, avoiding spills, and dispose of any remaining water responsibly. Thoroughly clean the bottle adapter tube each time a new bottle is installed, using a soft cloth and food-grade sanitizer.
When refilling, use only potable water and avoid overfilling the bottle to prevent leakage. Ensure the bottle cap is securely tightened before placing it onto the dispenser. Inspect the bottle for any cracks or damage before use; discard any compromised bottles.
Regular bottle changes and diligent cleaning of the adapter tube are vital for preventing bacterial contamination and ensuring consistently fresh-tasting water. Following these steps will contribute to the longevity and optimal performance of your Brio dispenser.

Food-Grade Sanitizer Usage
Maintaining a hygienic Brio water dispenser requires the consistent use of food-grade sanitizer. This is essential for eliminating bacteria and ensuring the purity of your drinking water. When cleaning the cabinet, controls, bottle adapter tube, and water taps, always dilute the sanitizer according to the manufacturer’s instructions – typically a small amount in water.
Apply the sanitizer solution with a soft, clean cloth, thoroughly wiping down all surfaces that come into contact with water. Avoid abrasive cleaners, as they can damage the dispenser’s finish. After cleaning, rinse all sanitized areas with potable water to remove any residual sanitizer taste or odor.
Bleach solutions can also be used, but ensure they are thoroughly rinsed away. Always prioritize food-grade sanitizers designed specifically for water dispensing systems. Regular sanitization, combined with routine cleaning, will safeguard your Brio dispenser and provide you with consistently safe and refreshing water.
Long-Term Storage & Reactivation
If your Brio water dispenser will be unused for an extended period – longer than 24 hours – it’s crucial to prepare it for storage. Begin by completely draining the reservoir and disconnecting the unit from both the power source and the water line (if applicable). Thoroughly clean and sanitize all internal components, including the bottle adapter tube and drip tray, following the procedures outlined in the cleaning section.
Ensure the dispenser is completely dry before storing it in a cool, dry location, protected from direct sunlight and extreme temperatures. When reactivating the dispenser after storage, reconnect the water line and power. Initial flushing is vital: dispense several gallons of water to purge any stagnant water and ensure optimal water quality.

Check for leaks and verify proper operation of both the hot and cold water functions. If the hot water light flashes and the unit beeps upon reactivation, consult the troubleshooting section for guidance. Proper storage and reactivation will prolong the life of your Brio dispenser.
Safety Precautions
Prioritize safety when operating your Brio water dispenser. Always ensure the unit is properly grounded and connected to a compatible power source. Never operate the dispenser if the power cord is damaged. Keep the area around the dispenser clean and free from obstructions to prevent accidents.

Exercise caution with hot water: the dispensed water can reach scalding temperatures. Supervise children and individuals with limited dexterity when using the hot water function. Avoid touching the hot water tap or surrounding areas during and immediately after dispensing.
Do not attempt to disassemble or repair the dispenser yourself; contact qualified service personnel for assistance. Use only food-grade sanitizers and cleaning agents as recommended in this manual. If the dispenser malfunctions, immediately disconnect it from the power source and consult the troubleshooting guide. Regular maintenance and adherence to these precautions will ensure safe and reliable operation.
Brio Dispenser Model Variations
Brio offers a diverse range of water dispenser models to suit various needs and preferences. These variations primarily differ in their cooling capacity, heating performance, and connection options – bottle-fed, direct water line, or both. Some models feature advanced filtration systems, including UV sterilization, for enhanced water purity.
Certain Brio dispensers boast sleek, modern designs with digital temperature controls and child safety locks. Others prioritize simplicity and affordability with basic mechanical controls. The capacity of the hot and cold water reservoirs also varies between models, impacting dispensing frequency.
Understanding your specific Brio model is crucial for proper operation and maintenance. Refer to the model number located on the unit’s label and consult the corresponding documentation for detailed instructions. While core functionalities remain consistent, specific features and settings may differ significantly across the Brio product line.